

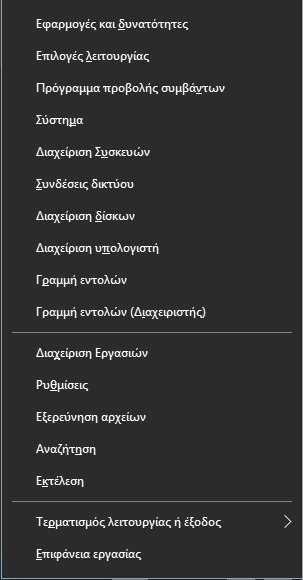
Microsoft introduced a menu with functions from Windows 8 onwards, which appears by right-clicking in the lower left corner of the screen or by pressing the Win + X keys simultaneously.

In Windows 8.1 and Windows 10, you can simply right-click the Start button to bring it up. This menu has shortcuts to useful administrative tools and system functions. However, it is not a customizable part of the operating system.
The user cannot add the applications and commands they want to the Win + X menu. Today, we will see how you can rename a Win + X menu shortcut without using third-party tools.
To access the Win+X menu in Windows 10, you have two options:
- Right-click the Start button. Instead of the taskbar context menu, Windows 10 displays the Win + X menu.
- Or, press the Win + X shortcut keys on the keyboard simultaneously.
The Win+X menu entries are all shortcut files (.LNK), but customizing the menu is not an easy task because Microsoft intentionally made it difficult to customize, to prevent third-party applications from abusing it and placing their own shortcuts.
The shortcuts are all special, they are passed through a Windows API hash function (hash function) and the hash is then stored within these shortcuts. The presence of the hash tells the Win+X menu that the shortcut is special and only then will it appear in the menu, otherwise it will be ignored.
However, you can slightly modify the default shortcuts included in the Win+X menu. Changing the “Comment” field on a shortcut does not break the hash sum and still allows Explorer to read it and use it as a name for the entry in the Win+X menu. This way, you can rename any shortcut in the Win+X menu. If we confused you with the hash function, just see that you can rename the commands in the Win+X menu easily and without any functionality issues.
How to rename Win + X menu shortcuts in Windows 10:
1. Open File Explorer and go to the drive where Windows is installed (usually C).
2. Go to the folder C > Users > Your_Name > Microsoft > Windows > WinX (alternatively copy-paste the following into the address bar of File Explorer: %LocalAppdata%\Microsoft\Windows\WinX )
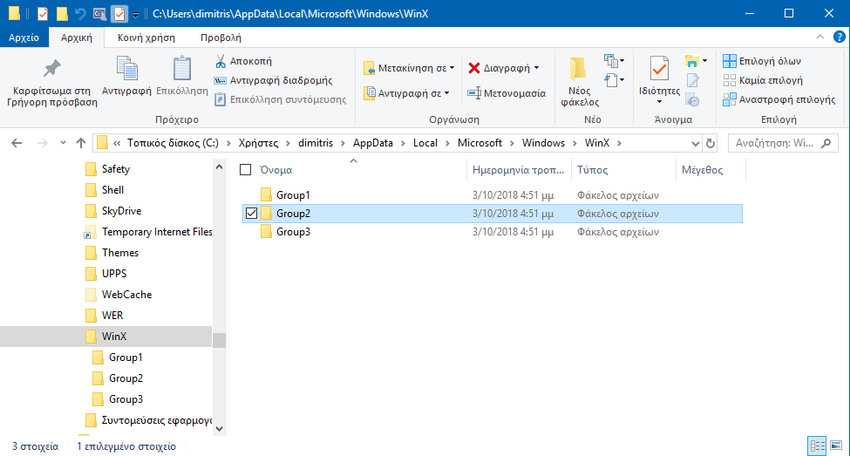
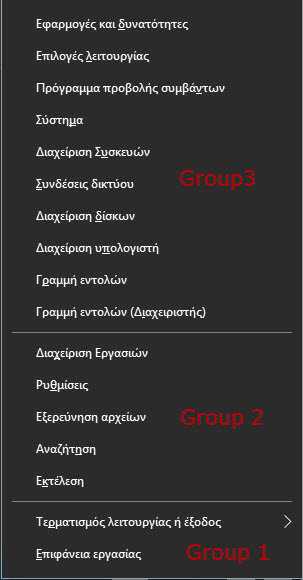
3. Open the Group1 (bottom), Group2 (middle), or Group3 (top) folder to find the desired shortcut.
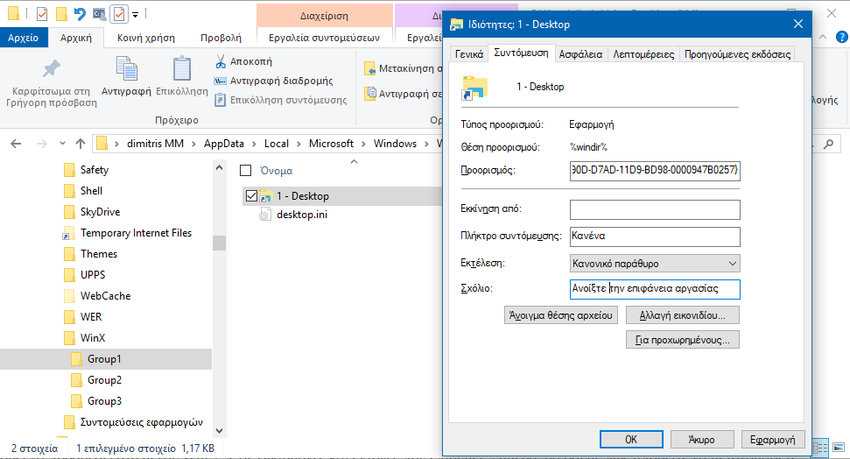
4. Right-click on the desired shortcut and select “Properties” from the context menu.
5. Type the new name you want to assign to the shortcut in the “Comment” field.
6. For the changes to take effect, you will need to log out and log back in to your user account. Alternatively, you can restart Explorer.

Keep in mind that Microsoft can implement various changes to Windows 10 through updates, so this trick may stop working at any time.
