

There is no person in the security who has not heard of Nmap, the quintessential network scanning tool. In this article we will try to analyze the usefulness of this tool and show the possible ways in which you can install it on your computer. Unfortunately, since it is impossible to see all the commands that we can use in Nmap one by one, we will try to show the main ones.

Some of Nmap's features include host discovery, port scanning on each host, service and OS fingerprinting of each host, and basic vulnerability detection. In addition, there is the option to use ZeNmap, a graphical version of Nmap.
How to install it
Nmap can be used on Windows. However, it is recommended to use the Linux as Nmap works faster and better on it. Some of the limitations that someone using Nmap on Windows may encounter are:
- There is no scanning capability for the machine on which Nmap is running.
- Only Ethernet interfaces are supported.
- Some scans take much longer to complete than the equivalent time it would take to complete in a Linux environment.
Here we should note that in Kali Linux, you can find Nmap pre-installed.
Windows
- Visit https://Nmap.org/download.html and download the latest self-installer version.
- Run the .exe file you just downloaded and accept the terms of use
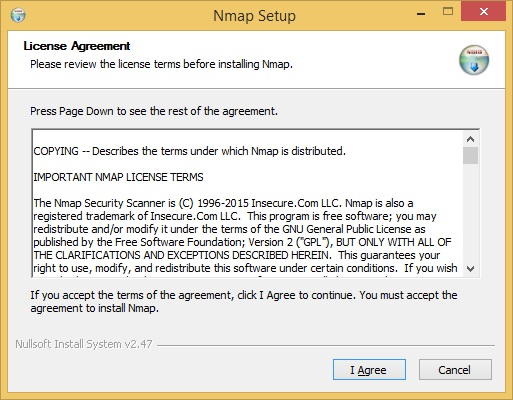
3. Select the components you want to install.
4. Finally, select the installation folder.
5. The installation will be completed within a few minutes.
Linux
The installation process for Nmap for Linux versions is very simple. Simply open a terminal and depending on your Linux flavor type the corresponding command to install the Nmap package:
- CentOS
| yum install nmap |
- Debian
| apt-get install nmap |
- Ubuntu
| sudo apt-get install nmap |
How does Nmap work?
To better understand exactly how Nmap works, the different types of scans it offers, with the SYN scan being the most common choice, we need to understand how the following work:
3 Way Handshake
When communicating with a TCP service, the connection is established through a 3 Way Handshake. This consists of the following steps:
- Step 1: computer A sends a TCP SYN to computer B on the port associated with the corresponding service (e.g. 80 HTTP, 25 SMTP, 22 SSH)
- Step 2: Computer B receives the SYN, and responds with a portion of the SYN ACK,
- Step 3: Computer A receives the SYN ACK and responds with an ACK
In the above steps, the firewallcanbe a separate device or it can operate as local software on computers. As is known, the job of a firewall is to protect a system from unwanted traffic and packets.
Open, closed and filtered doors
In the case of the Nmap scan, there can be 3 possible results on the terminal of the one running the scan:
- Filtered port: Occurs when the specified port has not responded at all. The SYN packet has been blocked by the firewall.
- Closed port: Occurs when there is no service running on that port and the firewall has allowed the connection to pass. It can also mean that there is no firewall.
- Open port: Occurs when there is a service running on this port and is accessible from the outside.
Types of Nmap scan
There are different types of scans that can be performed using Nmap. Some of them are:
- TCP Scan: Used to check and complete the three way handshake between the attacker and the target computer. This type of scan can be very easily detected because the specific service is logged and can trigger the Intrusion Detection System.
- UDP Scan: Used to check if there is an accessible UDP port waiting for incoming connections on the target computer. Unlike TCP, UDP does not have a mechanism to respond and acknowledge receipt of the packet, and for this reason we encounter false positives. It is considerably slower than TCP because machines tend to delay their responses to such traffic as a security precaution.
- SYN Scan: Unlike a regular TCP scan, Nmap creates and sends its own SYN packet, which is the first packet sent to establish a TCP connection. What is important to explain here is that the connection is never completed, but the responses of the target computer are analyzed by Nmap.
- ACK Scan: ACK scans are used by Nmap to “understand” whether a port is open, closed, or filtered. This is quite useful in cases where the attacker is trying to verify the presence of a firewall and the rules associated with it.
- FIN Scan: Works like the SYN scan, except it sends TCP FIN packets. Most computers respond with an RST packet when they receive a FIN. This way, the attacker can bypass many firewalls but still be detected by the IDS.
- NULL Scan: In this case, the packets sent contain null headers, so they are not valid packets.
- XMAS Scan: This particular scan is called this because the flags of all packets are enabled, more specifically the PSH, URG and FIN flags.
- RPC Scan: Used to detect machines that respond to Remote Procedure Call (RPC) services. These services allow remote execution of commands on a machine.
How to use it
To see all the tool's available commands, in a terminal type Nmap:
root@kali:~# Nmap Nmap 7.80 ( https://Nmap.org ) Usage: Nmap [Scan Type(s)] [Options] {target specification} TARGET SPECIFICATION: Can pass hostnames, IP addresses, networks, etc. Ex: scanme.Nmap.org, microsoft.com/24, 192.168.0.1; 10.0.0-255.1-254 -iL<inputfilename> : Input from list of hosts/networks -iR<num hosts> : Choose random targets --exclude<host1[,host2][,host3],...> : Exclude hosts/networks --excludefile<exclude_file> : Exclude list from file HOST DISCOVERY: -sL: List Scan - simply list targets to scan -sn: Ping Scan - disable port scan -Pn: Treat all hosts as online -- skip host discovery -PS/PA/PU/PY[portlist]: TCP SYN/ACK, UDP or SCTP discovery to given ports -PE/PP/PM: ICMP echo, timestamp, and netmask request discovery probes -PO[protocol list]: IP Protocol Ping -n/-R: Never do DNS resolution/Always resolve [default: sometimes] --dns-servers<serv1[,serv2],...> : Specify custom DNS servers --system-dns: Use OS's DNS resolver --traceroute: Trace hop path to each host SCAN TECHNIQUES: -sS/sT/sA/sW/sM: TCP SYN/Connect()/ACK/Window/Maimon scans -sU: UDP Scan -sN/sF/sX: TCP Null, FIN, and Xmas scans --scanflags<flags> : Customize TCP scan flags -sI<zombie host[:probeport]> : Idle scan -sY/sZ: SCTP INIT/COOKIE-ECHO scans -sO: IP protocol scan -b<FTP relay host> : FTP bounce scan PORT SPECIFICATION AND SCAN ORDER: -p<port ranges> : Only scan specified ports Ex: -p22; -p1-65535; -p U:53,111,137,T:21-25,80,139,8080,S:9 --exclude-ports<port ranges> : Exclude the specified ports from scanning -F: Fast mode - Scan fewer ports than the default scan -r: Scan ports consecutively - don't randomize --top-ports<number> : Scan<number> most common ports --port-ratio<ratio> : Scan ports more common than<ratio> SERVICE/VERSION DETECTION: -sV: Probe open ports to determine service/version info --version-intensity<level> : Set from 0 (light) to 9 (try all probes) --version-light: Limit to most likely probes (intensity 2) --version-all: Try every single probe (intensity 9) --version-trace: Show detailed version scan activity (for debugging) SCRIPT SCAN: -sC: equivalent to --script=default --script=<Lua scripts> :<Lua scripts> is a comma separated list of directories, script-files or script-categories --script-args=<n1=v1,[n2=v2,...]> : provide arguments to scripts --script-args-file=filename: provide NSE script args in a file --script-trace: Show all data sent and received --script-updatedb: Update the script database. --script-help=<Lua scripts> : Show help about scripts.<Lua scripts> is a comma-separated list of script-files or script-categories. OS DETECTION: -O: Enable OS detection --osscan-limit: Limit OS detection to promising targets --osscan-guess: Guess OS more aggressively TIMING AND PERFORMANCE: Options which take<time> are in seconds, or append 'ms' (milliseconds), 's' (seconds), 'm' (minutes), or 'h' (hours) to the value (eg 30m). -T<0-5>: Set timing template (higher is faster) --min-hostgroup/max-hostgroup<size> : Parallel host scan group sizes --min-parallelism/max-parallelism<numprobes> : Probe parallelization --min-rtt-timeout/max-rtt-timeout/initial-rtt-timeout<time> : Specifies probe round trip time. --max-retries<tries> : Caps number of port scan probe retransmissions. --host-timeout<time> : Give up on target after this long --scan-delay/--max-scan-delay<time> : Adjust delay between probes --min-rate<number> : Send packets no slower than<number> per second --max-rate<number> : Send packets no faster than<number> per second FIREWALL/IDS EVASION AND SPOOFING: -f; --mtu<val> : fragment packets (optionally w/given MTU) -D<decoy1,decoy2[,ME],...> : Cloak a scan with decoys -S<IP_Address> : Spoof source address -e<iface> : Use specified interface -g/--source-port<portnum> : Use given port number --proxies<url1,[url2],...> : Relay connections through HTTP/SOCKS4 proxies --data<hex string> : Append a custom payload to sent packets --data-string<string> : Append a custom ASCII string to sent packets --data-length<num> : Append random data to sent packets --ip-options<options> : Send packets with specified ip options --ttl<val> : Set IP time-to-live field --spoof-mac<mac address/prefix/vendor name> : Spoof your MAC address --badsum: Send packets with a bogus TCP/UDP/SCTP checksum OUTPUT: -oN/-oX/-oS/-oG<file> : Output scan in normal, XML, s| <rIpt kIddi3, and Grepable format, respectively, to the given filename. -oA <basename>: Output in the three major formats at once -v: Increase verbosity level (use -vv or more for greater effect) -d: Increase debugging level (use -dd or more for greater effect) --reason: Display the reason a port is in a particular state --open: Only show open (or possibly open) ports --packet-trace: Show all packets sent and received --iflist: Print host interfaces and routes (for debugging) --append-output: Append to rather than clobber specified output files --resume<filename> : Resume an aborted scan --stylesheet<path/URL> : XSL stylesheet to transform XML output to HTML --webxml: Reference stylesheet from Nmap.Org for more portable XML --no-stylesheet: Prevent associating of XSL stylesheet w/XML output MISC: -6: Enable IPv6 scanning -A: Enable OS detection, version detection, script scanning, and traceroute --datadir<dirname> : Specify custom Nmap data file location --send-eth/--send-ip: Send using raw ethernet frames or IP packets --privileged: Assume that the user is fully privileged --unprivileged: Assume the user lacks raw socket privileges -V: Print version number -h: Print this help summary page. EXAMPLES: Nmap -v -A scanme.Nmap.org Nmap -v -sn 192.168.0.0/16 10.0.0.0/8 Nmap -v -iR 10000 -Pn -p 80 SEE THE MAN PAGE (https://Nmap.org/book/man.html) FOR MORE OPTIONS AND EXAMPLES
In the tables below we will see the different commands you can use for Nmap.
Scanning Techniques
| Parameter | Description | Example |
| -sS | TCP SYN port scan | Nmap -sS 192.168.100.100 |
| -sT | TCP connection port scan | Nmap -sT 192.168.100.100 |
| -sU | UDP port scanning | Nmap -sU 192.168.100.100 |
| -sA | TCP ack port scan | Nmap -sA 192.168.100.100 |
Host Detection
| Parameter | Description | Example |
| -Pn | Port scan only | Nmap -Pn 192.168.100.100 |
| -sn | Host detection only | Nmap -sn 192.168.100.100 |
| -PR | ARP detection on a local network | Nmap -PR 192.168.100.100 |
| -n | Disable DNS process | Nmap -n 192.168.100.100 |
Door detection
| Parameter | Description | Example |
| -p | Specific door or euro | Nmap -p 192.168.100.100 |
| -p- | Detection of all doors | Nmap -p- 192.168.100.100 |
| -F | Quick scan | Nmap -F 192.168.100.100 |
Service and operating system detection
| Parameter | Description | Example |
| -sV | Version detection of active services | Nmap -sV 192.168.100.100 |
| -A | Aggressive scan | Nmap -A 192.168.100.100 |
| -O | Operating system detection | Nmap -O 192.168.100.100 |
Performance
The parameter -T[0-5] determines the speed and detection of Nmap by a possible IDS presence, starting from T0 which is the slowest option but also the most stealthy at the same time and reaching option T5 which is the fastest and most detectable respectively.
| Parameter | Example |
| -T0 | Nmap -T0 192.168.100.100 |
| -T1 | Nmap -T1 192.168.100.100 |
| -T2 | Nmap -T2 192.168.100.100 |
| -T3 | Nmap -T3 192.168.100.100 |
| -T4 | Nmap -T4 192.168.100.100 |
| -T5 | Nmap -T5 192.168.100.100 |
We look forward to your feedback on the Nmap tool. What did you think of it?
