

Hosts file: What is it and how can we use it? Domain Name Servers (DNS) connect the Internet. They match the IPv4 and IPv6 addresses that servers use with human-recognizable domain names.
They are the equivalent of the Internet's phone book. But while DNS is absolutely essential for the functioning of the Internet, it is not the only way to connect IP addresses to domain names. You can also do this with Hosts files by connecting mysterious IP addresses to important domain names.
The Hosts file is a file that almost all computers have. Operating systems use it to map a connection between an IP address and a domain name.
It is an ASCII text file and contains IP addresses separated by a space and then a domain name. Each address occupies its own line. For example, the number 17.172.224.47 is Apple's IP address.
To place the above address in a Host file you must enter the following line using a text editor program (we recommend Notepad++ for Windows and Geany for Linux).
17.172.224.47 Apple.com
For the entry to be valid, you cannot use website names that contain \\, /, or http://.
If you put the # symbol at the beginning of the line, you are essentially disabling the entry. The Hosts file will ignore it and read the one below if it exists.
When an entry is valid, your computer will use the address mapping in the Hosts file and not look it up in DNS.
But why go through such a process when your DNS provider automatically looks up the addresses for you? There are two main reasons.
First – and of little importance – when you are directed to a website from the Hosts file, your computer will read the address a few milliseconds faster than it would from DNS.
Using the file you can speed up the resolution of the address you want to visit. If you always visit the same websites (as most of us do) you could use the lightweight DNS server Dnsmasq caching. (We will write about the Dnsmasq DNS server in a future post). This program automatically stores DNS queries, and so that the next time you visit a site, your computer will look it up in the local Dnsmasq memory instead of wasting time searching the DNS. This can save about 50% of your DNS lookup time.
But where Hosts files are really useful is that they allow you to block ads, spyware sites, malware , and tracking sites. It can do this very easily by simply preventing your computer from connecting to annoying websites.
Specifically, you can list the websites you do not want to visit in the Hosts file and give them the loopback address 127.0.0.1 using IPv4 addressing or ::1 for IPv6 addresses.
What will happen next is that when a website, an email message, or something else tries to direct you to an address you have blocked, the Hosts file intervenes and you cannot go to the contentious domain.
You may wonder “how can you know which websites to avoid?” Good question, because there are thousands of them.
Fortunately, there are three hosts files to get you started. They include a large list of known ad servers, cookie tracking sites and other web locations you want to avoid. You will find the files at the links below:
How to make the internet not suck (as much),, hpHosts, and MVPS Hosts.
There is also the Hosts File Project, but it hasn't been updated in a year.
To use any of the above hosts, you must first make a backup of the existing Hosts file. I usually rename the existing file to hosts.old.
Next, you create a file named “hοsts”. You never use an extension with the name hosts, such as hosts.txt, you simply use “hοsts”.
Where is the Hosts file?
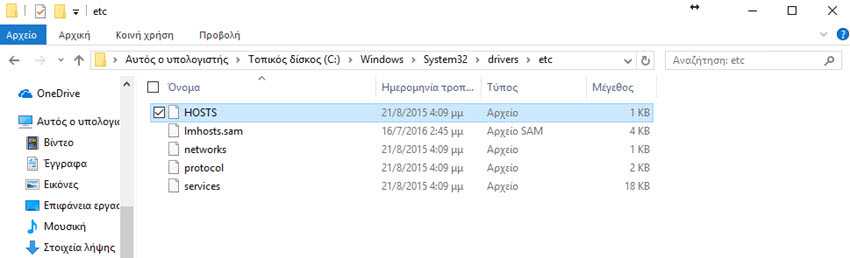
It depends on your operating system and its version.
For Windows, the above MVPS file includes an installation routine.
 | Windows 10/8 requires special instructions  see here see here |
| Windows 7 requires special instructions see here | |
| Win Vista requires special instructions see here |
With others, you simply copy and paste the main server file to the appropriate destination on your computer.
Preparation
Before using your own hosts file on a Windows system that is not part of a local domain (network), you must disable the Windows DNS Client Service. To do this, log on with an administrator account, click the Start button, and type “services.msc” in the search. Run services.msc and double-click the DNS Client. Set the startup type to manual and stop the service.
Windows Defender security program can also interfere with you. Windows security application can detect changes to the Hosts file as malware activity. To avoid this, you need to tell Defender to ignore the Hosts file by following these steps:
1. Open Windows Defender.
2. In the Settings tab, click the Excluded files and locations option.
3. In the Locations area, click the Browse button.
4. Locate and click on the hosts file.
Note: By default, the hosts file is located in the folder %systemroot%\system32\drivers\etc.
5. Click the Add button and then click the Save Changes button.
6. You can close Windows Defender.
Edit
Immediately after, you can edit the hosts file located at one of the following paths:
For Windows NT, Win2K and XP, at the path “C:\windows\system32\drivers\etc\hosts” or “C:\winnt\system32\drivers\etc\hosts”
On Windows 7 and Vista, it is at the path “C:\windows\system32\drivers\etc\hosts” or “%systemroot%\system32\drivers\etc\hosts”
On Windows 8.x and Windows 10, you will find it in the directory “C:\Windows\System32\drivers\etc\hosts”
On systems with Linux or macOS X, log in as root or use sudo, to move the main hosts file to the path “/etc/hosts” or on some systems to “/private/etc/hosts”. An example shell command:
sudo cp ~/hosts /etc/hosts
The cp command will copy the hosts file from your original ~/ folder to the etc folder. Once the host file is in place, you do not need to reboot.
If you are experiencing problems, re-open the hosts file with a text editor and check the IPs and addresses you added. To fix it, you can either delete the problematic entry (address) or place a # at the beginning of the line you consider to be causing the problem. Your computer will ignore it.
If all this fails, you can simply delete the new hosts file and replace it with the old one, as we mentioned from the beginning you should have created a backup before making the changes.
