Free HTTPS? Using SSL connections provides many benefits to your website. In addition to improving security, using the SSL protocol will help users gain more trust in your site, and it will increase your overall ranking in Google search results.
By using the SSL protocol, your website will operate under HTTPS and will be marked with a green padlock in the browser's address bar.
However, using SSL on your website costs quite a bit of money, depending on the type of certificate. It also inevitably requires installing the certificate on your server and you need to have the technical knowledge.
So let's see how you can deploy a valid SSL protocol for free and easily on WordPress site?
Conditions:
- You should have your own domain name and not the free ones from WordPress.
- You will also need to own the domain, which means access to the panel to change the nameservers
You will first need to create a free account with Cloudflare, which has been providing a free SSL feature to all of their customers for some time now, even for those using the free plan.
Creating an account and adding your site to Cloudflare is a very simple process. Simply provide your website's domain and Cloudflare will scan and configure everything from your existing DNS. After adding your website, you will be given two nameservers from the service that you will need to replace with the ones you are using.
This is of course done from your domain's administration panel. The new nameservers will look like the following:
GIORGOS.NS.CLOUDFLARE.COM
MARIA.NS.CLOUDFLARE.COM
The change process can take from 4 to 24 hours at best.
Once the DNS changes, your website will run through Cloudflare's infrastructure. Your pages will be stored and served through their CDN.
To be sure that the nameservers have changed, check your site with network tools
Enter your domain and it will show you the nameservers that serve the site.
Let's now add SSL to your website:
Log in to your Cloudflare account, and open the Crypto tab. There, set SSL (with SPDY) to Flexible.
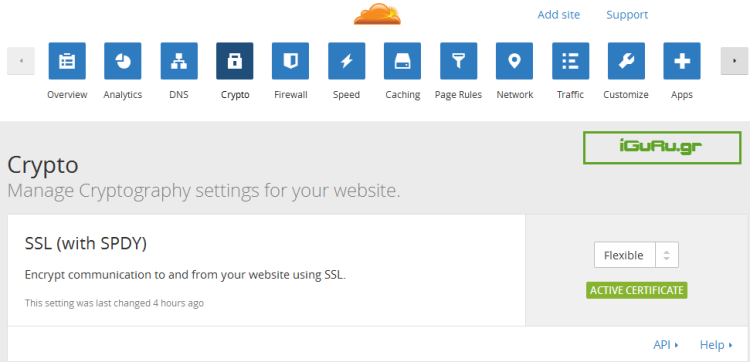
Log in to your website's admin panel. Install and activate the CloudFlare Flexible SSL. It will automatically fix issues like the "redirect loop" that will occur when you force your address to use HTTPS.
From the plugin settings, fill in the required information (site name, Cloudflare login email, and the API provided by the service).
After adding the plugin, your website is served through the Cloudflare network and will redirect every visit to such addresses. An extra step in Cloudflare.
Open the Cloudflare – Page Rules page and enable the Always use https on your domain.
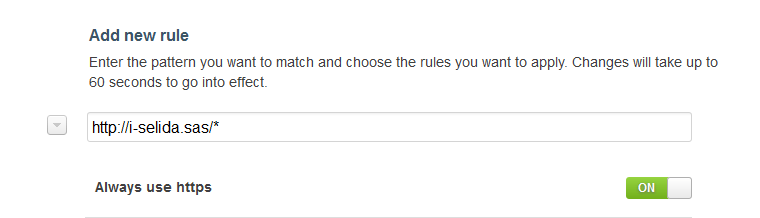
It would be a good idea to add, in addition to your page (https://i-selida.sas), a wildcard (*) to use https in all addresses.
Remember to click the Add Rule button to add the rule.
Wait from a few minutes to 24 hours for the installation to take effect on your website. Only then will you see your website using https.
Note:
The way you use https on your website without having to purchase an SSL certificate is possible with SNI or Server Name Indication. SNI allows the protocol to be granted to multiple server names, IPs, or websites with the same IP number. In this case, it is used by Cloudflare for their customers.
If you now click on the padlock that appears in your browser, you will see that the SSL has been assigned to Cloudflare.
You should also be aware that SNI only works with modern browsers. It should also be noted that this SSL only offers secure connections between your visitors and Cloudflare, while connections between Cloudflare and your server are not secure.
So if your website is used for financial transactions, you should choose Full SSL, which is not free and requires installing SSL on your server. However, for most blogging websites, Flexible SSL is sufficient.
Source: secnews.gr