Setup Docker using Windows Subsystem for Linux (WSL) so you can run all your commands and access your containers from a VM. First, you need to have WSL installed.

Setup the VM and install the Docker Daemon
Install Virtual Box and make sure you have the Host Only Network Adapter installed.
After setup, download the CentOS Minimal ISO and create a VM, installing CentOS. Make sure the RAM is not less than 2048MB. It is also best to create a user on your machine and avoid using the root account. Use the same USERNAME as the WSL USERNAME. This is not strictly necessary, but it is useful to avoid future errors. After the installation is complete, make sure it can connect to the internet and turn it off.
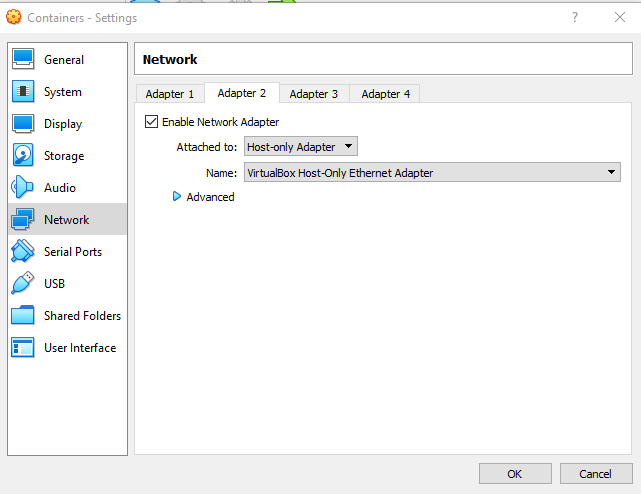
Now, go to the settings of your newly created VM, let's take as an example that it is called Containers. In the Networking, enable Adapter 2 and connect it to Host Only Network Adapter. Power on the system.
Power on the machine. You need to discover the new IP adapters, which you will use later. To do this, we will need the ifconfig command found by net-tools. Run the following commands:
sudo yum -y install net-tools
ifconfig -a
The second command will result in something similar to the following.
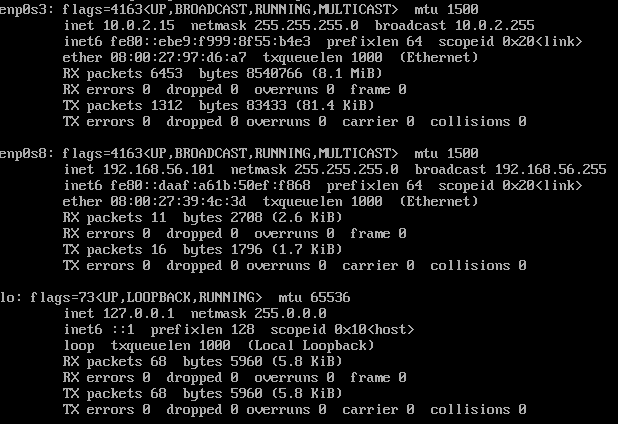
Make sure you have noted the IP.
Time to install Docker. Here are the commands from the Docker Documentation, which we recommend you read.
sudo yum install -y yum-utils \
device-mapper-persistent-data \
lvm2
sudo yum-config-manager \
--add-repo \
https://download.docker.com/linux/centos/docker-ce.repo
sudo yum install docker-ce docker-ce-cli containerd.io
Docker is now installed, you can activate it.
sudo systemctl enable docker
And now, make sure it runs with
sudo systemctl status docker
Finally, add the user to the docker group. Note: If you are using a different username in WSL, add that instead of $USER.
sudo usermod -a -G docker $USER
Setting up Docker CLI in WSL to control Docker from Windows.
Now, exit the VM and load WSL. Install Docker's dependencies, add the pgp key , and add the stable repository for Ubuntu.
sudo apt-get install -y \
apt-transport-https \
ca-certificates \
curl \
software-properties-common
curl -fsSL https://download.docker.com/linux/ubuntu/gpg | sudo apt-key add –
sudo add-apt-repository \
“deb [arch=amd64] https://download.docker.com/linux/ubuntu \
$(lsb_release -cs) \
stable”
Now, update your system and install the latest
sudo apt-get update -y
sudo apt-get install -y docker-ce
Install Docker Compose using PIP (with commands, if you don't already have it)
sudo apt-get install -y python python-pip
pip install –user docker-compose
Make sure the volume positioning functions are working.
For this, you need to edit the volume mounts to make sure everything works. This requires you to have Windows 10 1803 or later.
Add the following 3 lines to /etc/wsl.conf with a text editor of your choice. I use VIM.
[automount]
root = /
options = “metadata”
You will need to reboot for these changes to take effect.
You need to instruct WSL to use the VM's Docker Host. Remember the IP for Host Only Network Adapter by replacing it (VMIP) and the VM username below (VMUN).
echo “export DOCKER_HOST=ssh://<VMUN> @<VMIP> :2375” >> ~/.bashrc
source ~/.bashrc
It's time to get started! Run docker info and you're all set.
docker info
You will be prompted for the VM password and then the result will be returned.
Setting up SSH Keys
Obviously it is very tedious to set up SSH Keys every time we run a command, so we can set up SSH Keys to avoid this.
Create an RSA SSH Key in WSL
ssh-keygen -t rsa
Create the ssh folder in your VM
ssh<VMUN> @<VMIP> mkdir -p .ssh
Add the SSH key to the VM's Authorized Keys
cat .ssh/id_rsa.pub | ssh<VMUN> @<VMIP> 'cat >> .ssh/authorized_keys'
Set permissions on the VM's .ssh directory
ssh<VMUN> @<VMIP> "chmod 700 .ssh; chmod 640 .ssh/authorized_keys"
Now, Docker, as well as any other sessions via SSH, will work without prompting you for a password.
Editing the Hosts file
Edit the Hosts file on your local Windows machine. Add the following two lines (the first is a comment) to the hosts file located at C:\Windows\System32\drivers\etc . Remember to replace the IP with your own.
## Docker
<VMIP>docker
We hope we helped you with our guide.