

Hard drives today are available in various capacities and you can find one that can even accommodate several terabytes of data. But the biggest limitation of hard drives is their speed. The speeds of hard drives are never that satisfactory with the main reason behind this being the presence of rotating components inside it. On the other hand, if speed is your first priority, SSDs are the best possible option in the market, with the only problem being their price. Yes, I am talking about the price per gigabyte of SSDs, which are significantly higher than those of old school mechanical hard drives. However, we all have cloud storage spaces these days.
If you are always connected to the internet, you don’t have to pay for every gigabyte you use, as you can use cloud storage, which always comes with some free options for everyone with a storage limit. If you were using Google Backup & Sync or Dropbox sync, which automatically syncs things on your hard drive and cloud storage, you can’t use the same thing and allocate a few dozen gigabytes to your limited storage SSD that only contains your data and important files. Although SSDs are not prone to physical damage, once you lose some data from your SSD, it is difficult to restore it. You can use dozens of gigabytes to install some heavy programs and significantly increase their overall performance. Therefore, it is useless to use these sync services if you are using an SSD.
But the biggest advantage of sync services is that you don't have to upload the files every time. You just save them to the sync folder and they are automatically uploaded to the cloud and to the computers that have the sync service installed. But if you have an SSD and want the same thing without using up the expensive gigabytes of your SSD, you should use CloudMounter and map your cloud storage as a mapped drive in Windows.
But if you want to combine the two best options, there is an alternative to CloudMounter that you can use.
Let's start with how you can map cloud storage drives to your Windows computer.
The steps you need to follow
Step 1: To get started, first download the installer for NetDrive for Windows from the following link. Once downloaded, install it on your system.
Step 2: The installation file does not come with any unnecessary software or malware, so you will proceed with the installation without any problems.
Step 3: When you open the NetDrive program, you will see the following. Simply log in with a NetDrive account if you already have one, or simply create a free NetDrive account. Alternatively, you can even log in with Facebook, Twitter, or an existing Google account.
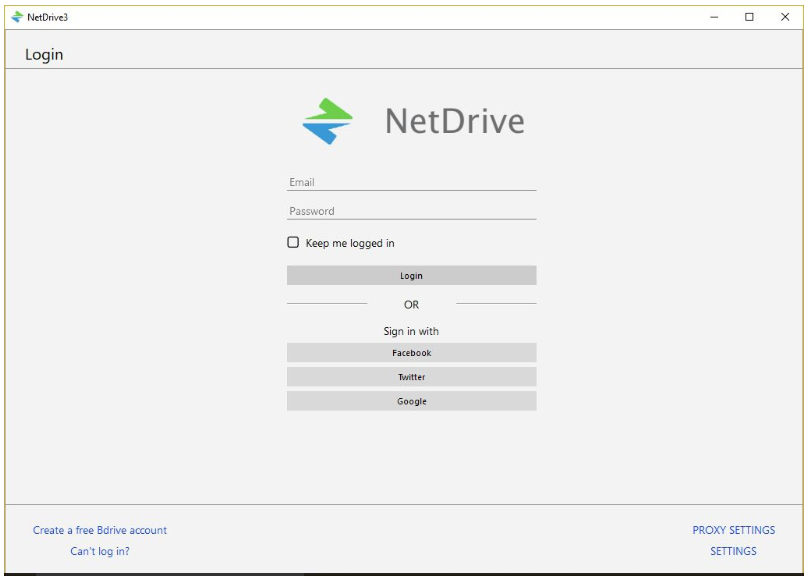
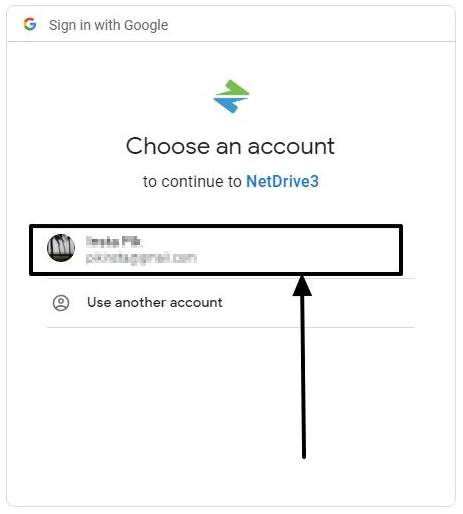
Step 4: After signing in with your Google account, a new browser tab/window will open, where you will need to select your Google Account.
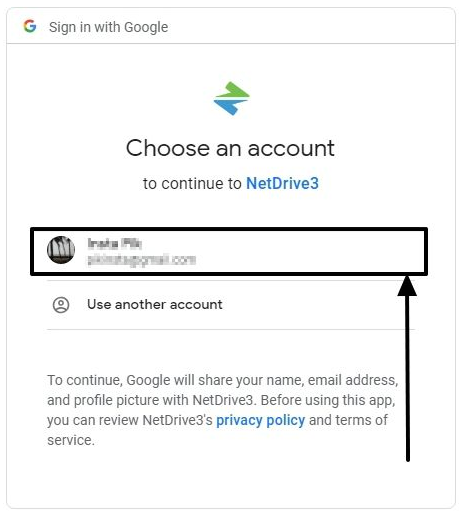
* Make sure you are already logged in to your Google account with your default browser or are currently logged in. There are no options to enter your Google user ID and password in the NetDrive user interface.
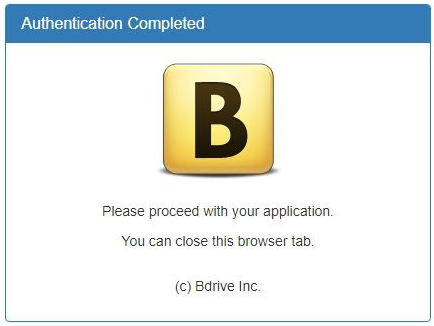
Step 5: Once authentication is complete, you will receive the following message in your browser tab.
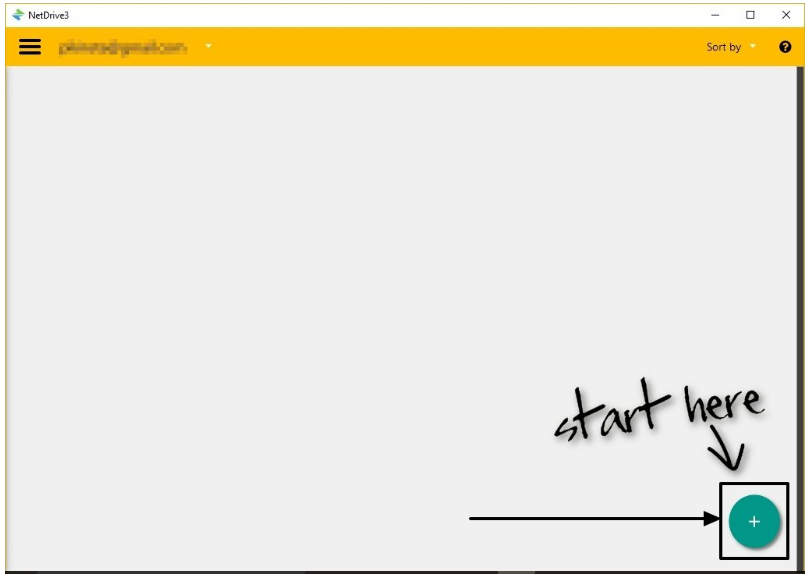
Step 6: You are ready to add cloud storage accounts now. In the next window, simply click on the '+' icon to start adding a new cloud storage account.
Step 7: In the window that now appears, simply select the “Storage Type”, which is basically your cloud storage provider like Google Drive, Dropbox, etc. from the drop-down menu. Now select the mounting method and other basic settings, which can alternatively be changed later, and finally click on ‘Connect’.
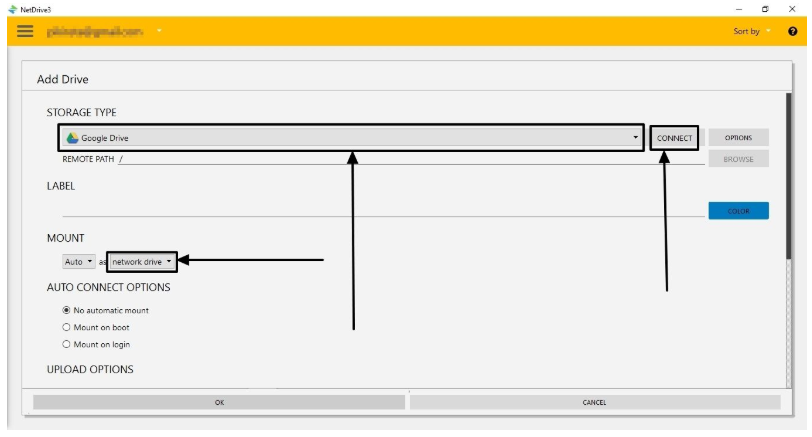
Step 8: A new browser tab/window will open again, where you will need to log in with your account that is linked to your cloud storage account.
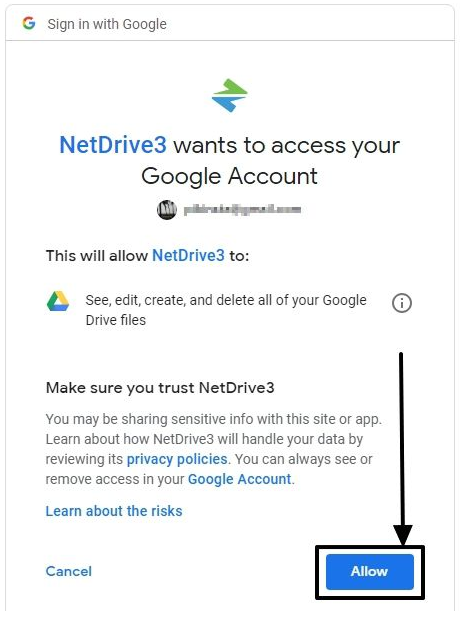
Step 9: After selecting the account, you will be asked to grant certain permissions so that NetDrive can access the contents of your cloud storage account. Simply review the permissions requested, which are not overwhelming, and click 'Allow'.
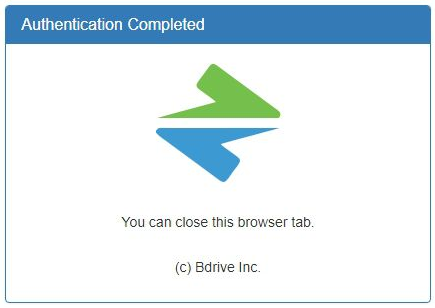
Step 10: Once authentication is completed successfully, the following message will appear in the browser tab.
Step 11: Now go back to NetDrive and you will see that everything is ready with your Google Account. You can change the settings later. But if you are happy with the default settings, just click 'OK'.
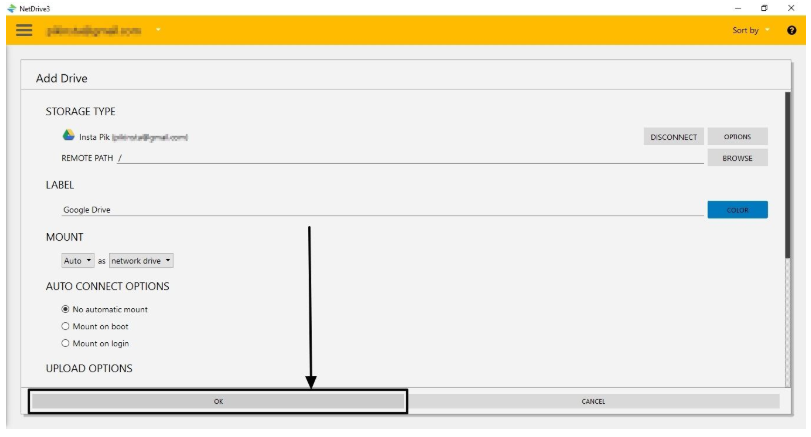
Step 12: Now you can find the connected cloud account. Simply click 'Connect' to find the Google Account as a mapped Google Drive in Windows Explorer.
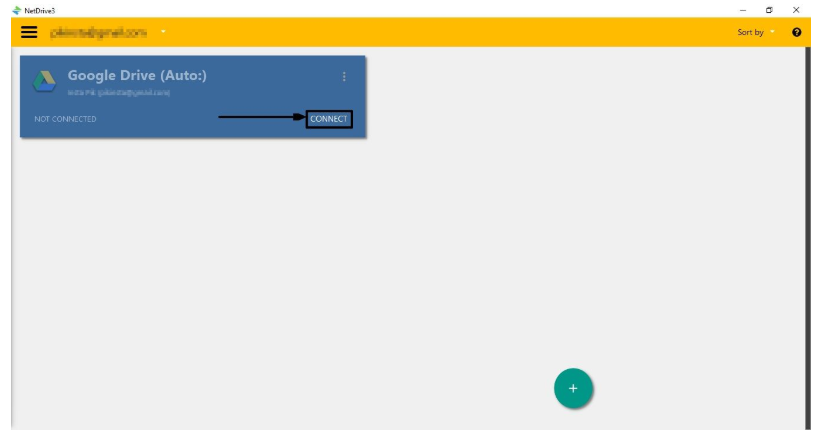
Step 13: See how the files will appear in Windows Explorer.
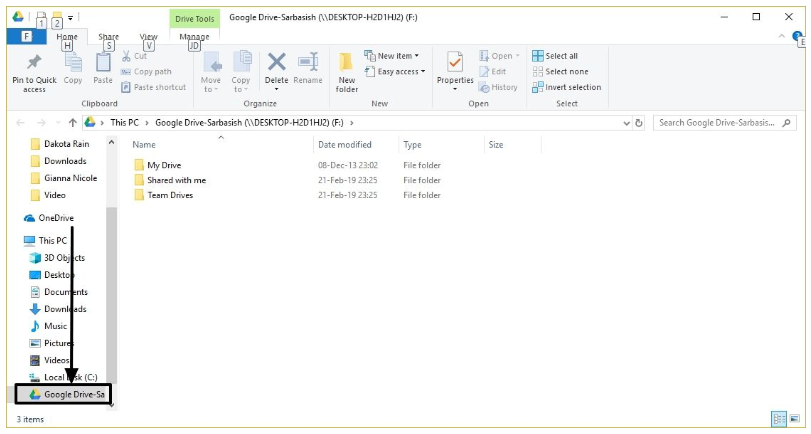
Step 14: You can disconnect your cloud account at any time. Simply click on 'Disconnect' corresponding to your cloud account.
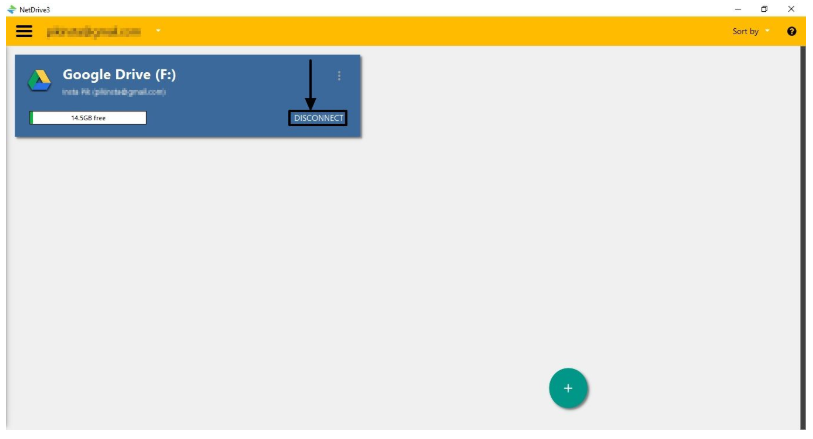
Step 15: You can now add as many storage accounts as you want by repeating the same steps to connect to a cloud storage service again. We didn’t find any limit imposed by NetDrive on the number of cloud storage accounts you can connect. So, you can connect literally any number of cloud storage accounts depending on the number of computers they support.
I have added 3 of my accounts to Google Drive and it worked fine.
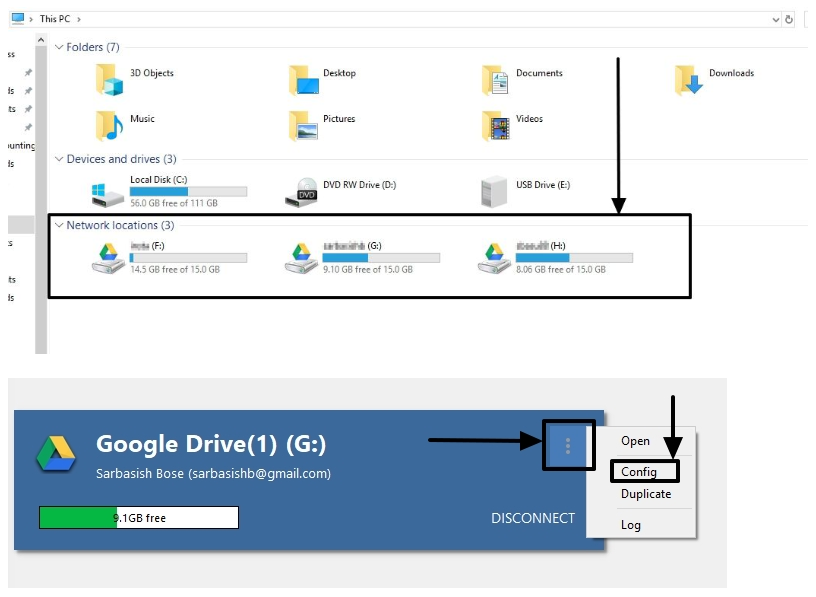
Not only that, but you can even change the settings for all the individual cloud storage accounts you have connected.
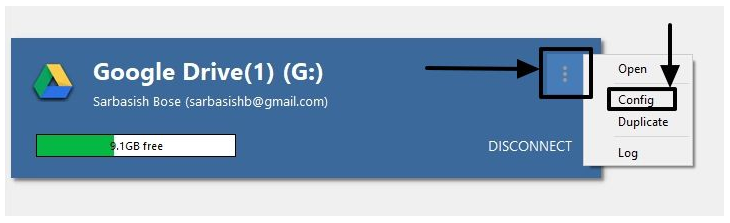
Step 16: Open NetDrive and tap the triple dots corresponding to your cloud storage account and then 'Config'.
Here you can change different settings, some of which are below.
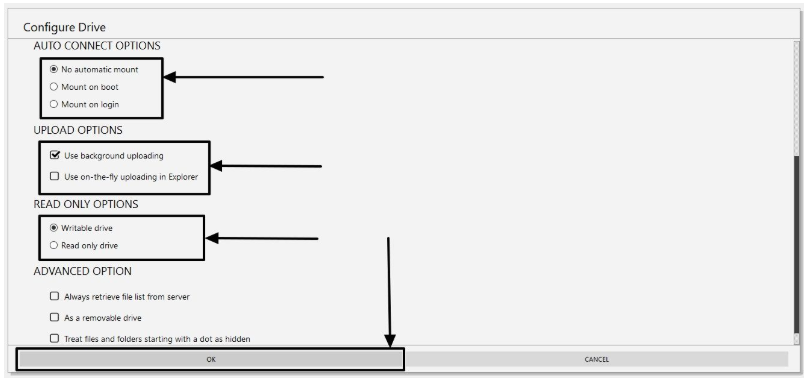
You can configure whether you want to mount cloud storage drives at startup, login, or not during automatic installation if you prefer manual installation.
You can choose whether you want to use direct upload via Windows Explorer or background upload. Background upload is better as this will save time, while during upload the files will be uploaded as they are copied, which may not be possible every time.
There are other settings that can help you mount drives as removable storage, whether you want NetDrive to search the file list every time, the drive label, and more.
Once you're done configuring everything, simply click “OK”.
NetDrive is a great and complete solution if you don’t want multiple gigabytes of backup on your hard drive or SSD to sync all the cloud storage accounts you have access to. Today, NetDrive supports all the major cloud storage services including Google Drive, Dropbox, OneDrive, Box, Amazon Drive, Swift, WebDAV, FTP services, etc. So, the list of NetDrive cloud storage services is not disappointing at all.
I hope the information was helpful to you. If you still have questions, don't hesitate to comment below.
