

Windows 10 automatically performs system maintenance tasks, such as security scans and disk optimization, on a schedule. By default, Windows runs these tasks every day at two in the morning, and “wakes up” your PC for this purpose (if it’s asleep).
What is automatic maintenance?
The Automatic Maintenance feature was added in Windows 8, continues to the current Windows 10, and is used to perform system maintenance tasks. It combines a number of different background tasks and runs them simultaneously.
These tasks are scheduled to run at 2am by default, and only run if you are not using your computer at that time. Again, by default, Windows will wake your computer, if it is asleep, to run the tasks (a laptop running on battery power will not wake up at that time, however). Windows will put your PC back to sleep (hibernate) when they are finished.
The maintenance window only runs for one hour. If tasks are not completed within that hour, Windows will stop and complete its work during its next maintenance. Some tasks have “deadlines” and will be fully completed even if the maintenance window closes and they are not finished.
If you are using your computer during the scheduled time, or if your computer is turned off during the scheduled time, these maintenance tasks will be performed at the next available time when Windows sees that you are not using your computer. For example, if you leave your computer on and stop doing any tasks, Windows will start its maintenance.
What functions does Automatic Maintenance perform?
Maintenance tasks include software updates, security scans with applications such as Windows Defender, disk defragmentation and optimization, and other system diagnostic tasks.
In Windows 10, Windows Update is very aggressive and will install updates even outside of the maintenance window by default. However, Group Policy allows system administrators to force Windows Update to install updates during the maintenance window.
The exact order of tasks varies from computer to computer, as third-party software developers set their scheduled tasks to run during the maintenance window. In other words, Windows may also perform maintenance operations created by applications you have installed.
How to control when to run Maintenance
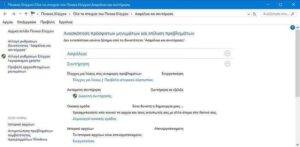
To check this feature, go to Control Panel > System and Security > Security and Maintenance. You can also open the Start menu, search for “Maintenance,” and click the “Security and Maintenance” shortcut to go directly to this screen.
Expand the "Maintenance" section to see the Automatic Maintenance options.
You will see when the last maintenance occurred (maintenance date and time). If you want to run maintenance tasks immediately, click the “Start Maintenance” button. You can click “Stop Maintenance” to stop maintenance tasks if they are currently running.
To schedule the time you want maintenance to occur and choose whether it will wake your computer, click "Change maintenance settings.".

To control the time, click the “Perform maintenance tasks daily at” box and select a time. You can select any time in one hour increments, from 12:00 AM to 11:00 PM.
If you want to prevent Windows from automatically waking your PC to perform these tasks, uncheck "Allow scheduled maintenance to wake the computer at the scheduled time.".
It's not really recommended to disable this feature. Windows will put your PC back to sleep when they're done, and this will ensure that these tasks don't slow down your computer while you're using it, but the final choice is yours.
Click "OK" when you're done to save your changes.
There is no way to actually stop these automatic maintenance tasks. They are important to keep your computer running smoothly. Maintenance tasks only run when you are not using your computer, so they should not interfere with your work.
